Since the car has a modern Edelbrock 1405 which doesn’t support the stock air cleaner I wanted to replace with an original Carter AFB. Remanufactured versions run $400-500, sometimes with a core deposit but since I don’t have the original, no core.
Model Numbers
According to this: http://www.thecarburetorshop.com/Kbuick3.htm the1965 401 had a 3921 or a 4453
According to: https://forums.aaca.org/topic/305440-what-model-carb-is-correct-for-1965-401-at-riviera/?do=findComment&comment=1703451 the 65 401 A/T had a 3921S.
Despite my engine being off a 63, I checked the manifold stamping and it matches a 65 401.
Plan & Challenges
- Purchase rebuildable carb
- Model 3921S seems quite hard to find. I found a carb on ebay that looks in reasonable condition, complete, including choke housing and throttle mechanism
- Challenge: My Edelbrock has an electric choke, Carter will be automatic and will need to find out how to run choke heat. Do I need to convert to electric?
- Disassemble, inspect and fully clean
- Purchase a carb rebuild kit
- While there are many available, recommendation seems to be to purchase from http://www.thecarburetorshop.com/Carbshop_kits.htm although they don’t list what is in their parts or price
- For comparison other carb kits run about $50
- Recommendation seems to be leather accelerator pump, which may come with the carbking kit https://www.jalopyjournal.com/forum/threads/carter-afb-accelerator-pumps.427811/
- Install and re-route fuel line
- Carter AFB 3921S has fuel inlet at front passenger side while Edelbrock has fuel inlet at rear passenger side. Interestingly my car has metal fuel lines run to pump where originally it was flexible line running between pump and filter, filter and carb
- Recommendation is to use flexible hose, fuel injection hose to be resistant to ethanol fuels
- Indicates original 5/16″ hose from pump to carb https://forums.aaca.org/topic/265979-main-fuel-line-size-on-65/
- https://www.rockauto.com/en/moreinfo.php?pk=3861654&jsn=2835 $3.50/ft
- https://www.napaonline.com/en/p/BK_7051227
- Recommendation is to replace fuel filter and flush fuel lines
- Choke
- As mentioned Carter carb has a hot air choke whereas current Edelbrock has electric choke. To return to hot air choke I would need to route fresh-air pipe to Exhaust manifold and choke stove pipe from Exhaust manifold to carb.
- There appear to be choke stove pipe replacement kits. $18 http://www.oldbuickparts.com/product_info.php?cPath=97_102_103&products_id=1429
- Useful discussion https://forums.aaca.org/topic/332060-riviera-exhaust-manifold-question/
- One risk is if the hot air pipe in the exhaust manifold is cracked, exhaust gases will leak into the choke. I believe exhaust manifold needs pulled to review that. Must also check to ensure this pipe hasn’t been plugged.
- The fresh air pipe appears to be rubber connected to steel. May not be a huge issue without it would simply mean the supply of air is entering from below the exhaust manifold https://forums.aaca.org/topic/240539-hot-air-choke-operation65/
- To convert to electric choke I would have to purchase an Edelbrock electric choke kit although only some of the parts would be necessary. These run $75 https://www.edelbrock.com/electric-choke-conversion-kit-for-performer-series-carburetors-1478.html
- As mentioned Carter carb has a hot air choke whereas current Edelbrock has electric choke. To return to hot air choke I would need to route fresh-air pipe to Exhaust manifold and choke stove pipe from Exhaust manifold to carb.
- Carb baffle
- Need to check if the carb baffle is in place that protects base of aluminum carb from corrosion of exhaust gases that cross the intake to heat the base of the carb. $17.50 http://www.oldbuickparts.com/product_info.php?products_id=656
- Dashpot
- I don’t currently have a dashpot. However it does not seem these are strictly necessary – designed to help the throttle return to idle in an orderly fashion.
- Dashpots are available for $30 http://www.oldbuickparts.com/product_info.php?products_id=6995
- Dashpot brackets on the other hand don’t seem to be available
- I don’t currently have a dashpot. However it does not seem these are strictly necessary – designed to help the throttle return to idle in an orderly fashion.
Dissassembly and Cleaning
- Unit looks complete including all linkages
- Secondary throttle plate is stiff possible the spring
- Air Horn attached by 10 bolts
- Secondary fuel jets are stuck and attempts to remove with screwdriver is eating the brass. Using an extractor bit is also eating the brass. Heating does not help. I will end up drilling out the jets. Replacements available https://quadrajetparts.com/jets-rods-accessories-c-299_130_132.html
- After soaking in Simple Green Extreme Aircraft cleaner for a few hours, unit has cleaned up substantially however dried gunk remains in float bowls and fuel passageways
- Soaked small parts in Gunk carb cleaner, light scrubbing and repeat soak has cleaned them up substantially
- Gunk can is too small to accept carb body; applied to a 5 gallon bucket but will need additional liquid to fully cover carb body.
Hot Idle Compensator
There is an odd part between secondary venturis which according to following is a Hot Idle Compensator
http://www.carburetor-blog.com/manuals/carter_afb_rebuild_manual.pdf
https://www.carburetor-parts.com/Hot-Idle-Compensator_ep_1844.html
The Carter AFB diagram from the carb rebuilding book is below, however (a) it is missing a couple of items like the accelerator pump check valve and the hot idle compensator and (b) does not detail the throttle linkages.
I found an additional diagram that appears to have an additional detail.
Checklist of parts
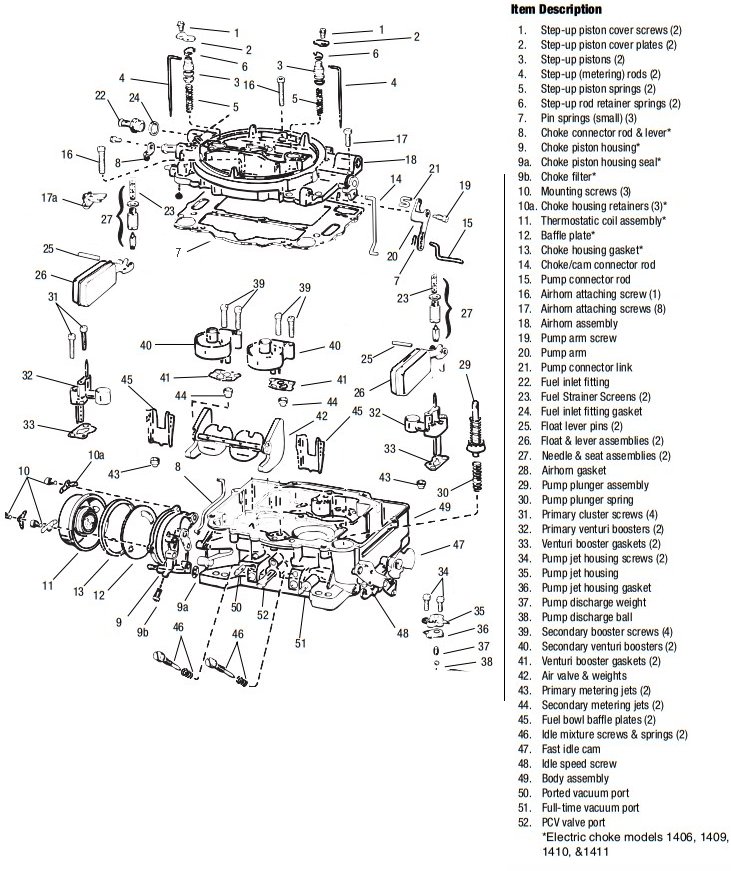
- Step up piston cover screws (2) – present
- Step-up piston cover plates (2) – present
- Step-up pistons (2) – present
- Step-up (metering) rods – present
- Step-up piston springs – present, although should likely be replaced
- Step-up rod retainer springs – present
- Pin springs small (3) – May not all be present
- Choke connector rod & lever – present
- 9-13 Choke parts. (No baffle plate)
- .
- .
- .
- .
- Choke cam / connector rod – present
- Pump connector rod – present
- Airhorn attaching screw (1) – present
- Airhorn attaching screws (8) – present – I had a 10th screw
- Airhorn assembly
- 19-21 Pump stuff – present
- .
- .
- Fuel inlet fitting – present
- Fuel Strainer screens (2) – Inside float assembly???? CHECK
- Fuel inlet fitting gasket – present – REPLACE
- 25-27 – Float assembly – PRESENT
- .
- .
- Airhorn gasket (mis-labelled as 7 in diagram) – REPLACE
- Pump plunger assembly – REPLACE
- Pump plunger spring – REPLACE
- Primary cluster screws (4) – present
- Primary venturi boosters (2) – present
- Venturi booster gaskets (2) – REPLACE
- 34-38 pump items.
- .
- .
- .
- .
- Secondary Booster Screws (4) – present
- Secondary venturi boosters (2) – present
- Venturi booster gaskets (2) – REPLACE
- Air valve & weights – present
- Primary metering jets (2) – present
- Secondary metering jets (2) – UNABLE TO REMOVE
- Fuel bowl baffle plates (2) – present
- Idle mixture screws & springs (2) – present but springs may need replaced
- Fast idle cam – present
- Idle speed screw – present
- Body assembly
- Ported vacuum port
- Full-time vacuum port
- PCV valve port
Not present in diagram
Check valve in accelerator pump bowl?
https://www.carburetor-parts.com/Carter-AFB-Pump-Inlet-Check-Assembly-53-73_p_871.html
More comprehensive diagram
The following diagram seems to be more complete:
https://www.tpocr.com/64-67carter4brlcarb.html
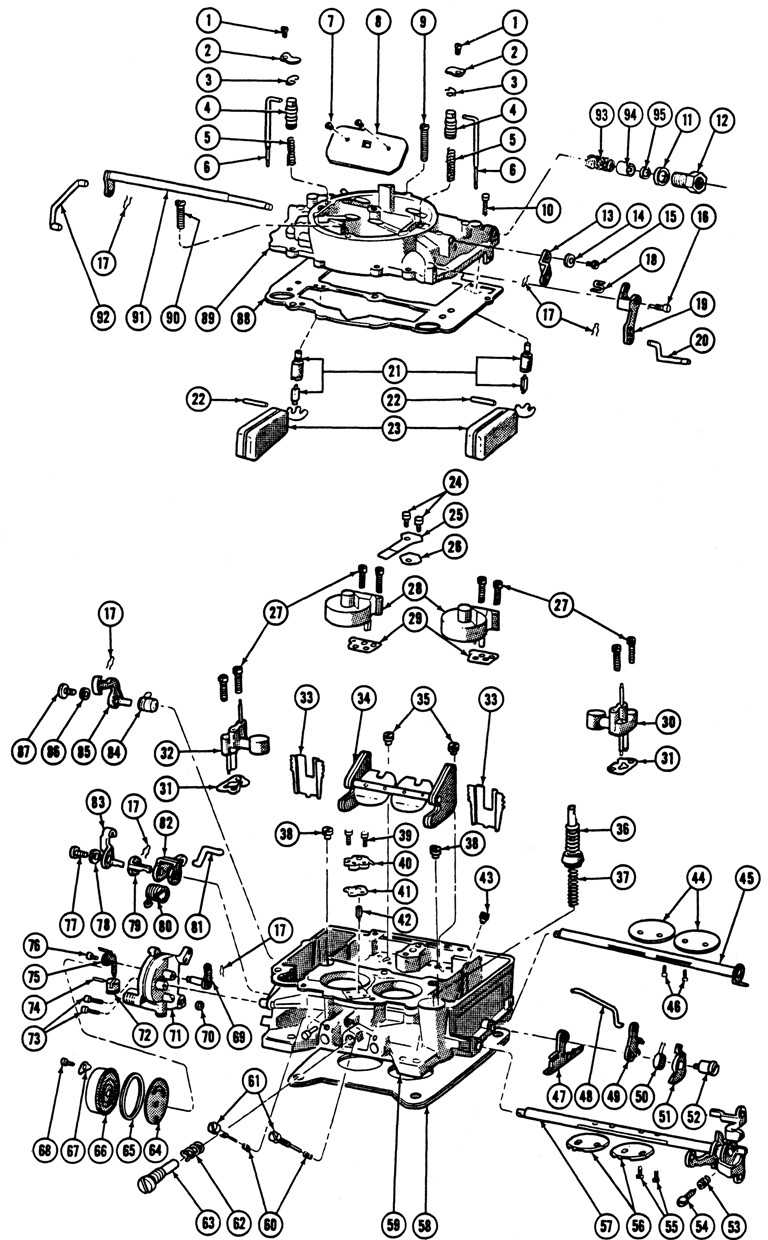
Step up valve and metering rods
Everything is present. The pistons are still a bit dirty after cleaning.
1) Screw & Washer, Step-up piston cover plate
2) Plate, Step-up piston cover
3) Spring, Step-up rod retainer
4) Piston, Carb. step-up
5) Spring, Carb. Vacuum piston
6) Rod, carb. Step-up
Air Horn Fasteners
There are 10 total screws holding the air horn on
9) Screw assy., Air horn (#10-30 x 15/16″)
10) Screw assy., Air horn – shorter than above
90) Screw assy., Air horn – longer
Fuel Inlet
Mine is more like first diagram – fitting and gasket. – replace gasket.
11) Gasket, Strainer nut
12) Nut, Fuel inlet
93) Spring, Fuel inlet filter – not present
94) Strainer, Fuel inlet – not present
95) Gasket, Fuel inlet strainer – not present
Choke lever
13) Lever, Choke shaft – Present
14) Washer, Choke shaft – Present
15) Screw, Choke shaft lever attaching (#6-32 x 5/16″) – Present
Acclerator pump linkage
16) Screw, Pump arm attaching – present
17) Retainer Spring, pump conn. link – I have a couple of retainer springs, could use more
18) Link, Carb. pump connector – present
19) Arm & Collar, Carb. Pump – present
20) Rod, Throttle connector – present
Floats
As per second diagram no strainer in seat.
21) Needle & Seat, Carb, intake – present
22) Pin, carb. Float lever – present
23) Float, Carburetor – present
Thermostatic Valve
24) Screw & Washer, Thermostatic valve attaching – present
25) Valve, Thermostatic – present
26) Gasket, Thermostatic valve – replace
Venturis
All present
27) Screw, Venturi attaching (#10-32 x 1″)
28) Venturi assy., Secondary – pump side & choke side
29) Gasket, Venturi cluster -secondary
30) Venturi assy., Primary -pump side
31) Gasket, Venturi cluster -primary – replace
32) Venturi assy., Primary -choke side
33) Baffle, Fuel bowl – present
34) Shaft, Valve & Weight assy., Auxiliary throttle – present
35) Jet, Secondary – STUCK, replace
36) Plunger & rod, Carb. Pump – present, replace
37) Spring, Pump return – present
38) Jet, Primary – present
43) Check assy., Pump intake ball – present
Pump Nozzle
39) Screw & Washer, Dust cover – present
40) Jet & Housing, Carb. Pump – this may be broken on the underside
41) Gasket, Pump jet housing – replace
42) Needle, Pump discharge check (1965) Ball, Pump discharge check (1966) – I have the needle which seems correct for a 65
Primary & Secondary Throttle and linkages
Secondary throttle is a bit stiff, it may be the spring (see below) – all present
44) Valve, Carb. throttle – secondary
45) Shaft & lever, Carb. Throttle – secondary
46) Screw, Throttle valve & lever – secondary
Secondary shaft lockout – all present
47) Dog, Secondary throttle shaft lockout
48) Rod, connector
49) Lever, cam trip
50) Spring, fast idle arm
51) Cam, fast idle
52) Screw, cam attaching
Primary shaft & throttle lever – all present (looks a little different than diagram)
53) Spring, Idle adjusting screw
54) Screw, Fast idle adjusting
55) Screw, Throttle valve & lever – Primary
56) Valve, Carb. throttle – primary
57) Shaft & Lever, Carb. Throttle primary
Idle adjusting
60) Spring, Idle adjusting screw – 2x present
61) Screw, Idle adjusting – 2x present
62) Spring, Idle air screw – plugged on mine
63) Screw, Idle air adjusting – plugged on mine
Choke
Choke is hot air but current carb has electric.
7) Screw, Choke valve (#3-48 x 7/32″) – present
8) Valve, Carb. choke – present
64- Plate, Coil housing baffle – did not have one of these
65- Gasket, Coil housing – replace
66) Housing & Coil., Carb, thermostatic – present
67) Retainer, Housing stat cover – present
68) Screw, Coil housing (#8-32 x 1/4′) – present
69) Shaft & lever, Choke piston housing – present
70) Gasket, Piston housing – replace
71) Housing assy., Choke – present
72) Piston, Carb. Choke – present – check
73) Screw, Choke Housing – present
74) Pin, Choke Piston – present – check
75) Lever & Link assy., Choke – check
76) Screw, Choke piston lever (#6-32 x 5/16″) – present
91) Shaft & Lever, Carb, choke – present
92) Rod, Choke – present
Throttle shaft levers, return springs
All present
77) Screw, Throttle shaft arm
78) Washer, Throttle shaft arm primary
79) Dog, Primary throttle shaft
80) Spring, Throttle flex
81) Rod, Throttle operating
82) Arm, Primary throttle shaft – inner
83) Arm, Primary throttle shaft – outer
84) Spring, Secondary return – may need replace
85) Lever, Secondary shaft operating
86) Washer, Throttle shaft arm secondary
87) Screw, Throttle shaft arm
Bodies and gaskets
58) Gasket, Carb, to Manifold – replace
59) Body assy., Carb. Throttle – A little pitted on the bottom
88) Gasket, Air horn – replace
89) Air Horn, Carburetor – ok